
Are you trying to DIY your online presence but are struggling to understand all the search engine optimization (SEO) terms? Are you worried about causing more damage or harm than good, or overwhelmed with deciphering what practices are essential and what could be saved for a rainy day?
Hello and welcome to the first chapter of our WordPress SEO for the Busy Entrepreneur series where we help our clients, fellow entrepreneurs, and aspiring digital marketers better understand the foundational practices of SEO for their website’s organization.
We know the stress of trying to run a business on top of marketing it. That’s why people come to us and we have a business! (Talk about the circle of life!) But we also have many wonderful clients who aren’t at that stage of their entrepreneurial journey, who need a professional website with reliable hosting and can’t afford a marketing agency quite yet. Yet, many have a drive that knows no bounds and are more than willing to put in the work updating their website with edits and blog posts. They just don’t have the time to learn what’s important, what’s less so, what resources to trust and learn from.
It’s become clear to us that there needs to be a resource for entrepreneurs who are willing to put in the work, but can’t afford a single moment more. For those who need the pieces broken down and targeted specifically for their WordPress site. For those who aren’t technically savvy and have no desire to be, they just want things to work and for customers to go 📈. If any of these sounds like you, you’re in the right place.
Today, we’ll be talking about Image Optimization, why it’s important and how it plays into your institutions marketing success, and ranking each piece by what’s most important as well as the process we recommend you take for the most efficient use of your time.
What is Image Optimization?
Image optimization is the process of converting high quality photographs, artwork, and graphics from their original state into copies that are optimized for websites and social media platforms. This process involves two main procedures:
- Cropping, resizing, and saving images into a compressed format while sacrificing minimal quality
- Correctly categorizing and describing the images you’re using through image metadata
Just like you wouldn’t want to wear a t-shirt that’s 5 sizes too big and claims to be “wrinkle-free” when it’s clearly not, you wouldn’t want an image on your website that takes 2 minutes to load and ends up not being what the user was looking for. The process of image optimization is like tailoring that oversized t-shirt to fit just right.
Image Compression: Tailor Your Images to the Digital World
Image Compression is ultimately about carefully cropping, resizing, and compressing the image file so it loads quickly and looks great on screens – without sacrificing the quality or intent of the original image.
Image Compression can be broken down into 4 steps:
- Crop: Crop the image so that the main focus is centered, if needed. Consider the platform(s) you’re uploading to and whether they use a square, rectangular, or circular aspect ratio. This not only reduces the file size, but also improves it’s impact.
- Resize: Digital cameras today are capable of taking superb quality photographs in 4K resolution. But images on web pages or social media platforms are rarely displayed at this resolution, since most images are not displayed full screen and the majority of internet users are using devices lacking 4K output. When in doubt, a 1200px width is more than enough for the vast majority of images used on a web page.
- Reformat: There are plenty of image formats out there nowadays. Each come with their own benefits and drawbacks, but to keep it simple: Use .jpg for images that have a background, and .png for images that have a transparent or no background. The default quality option should be sufficient.
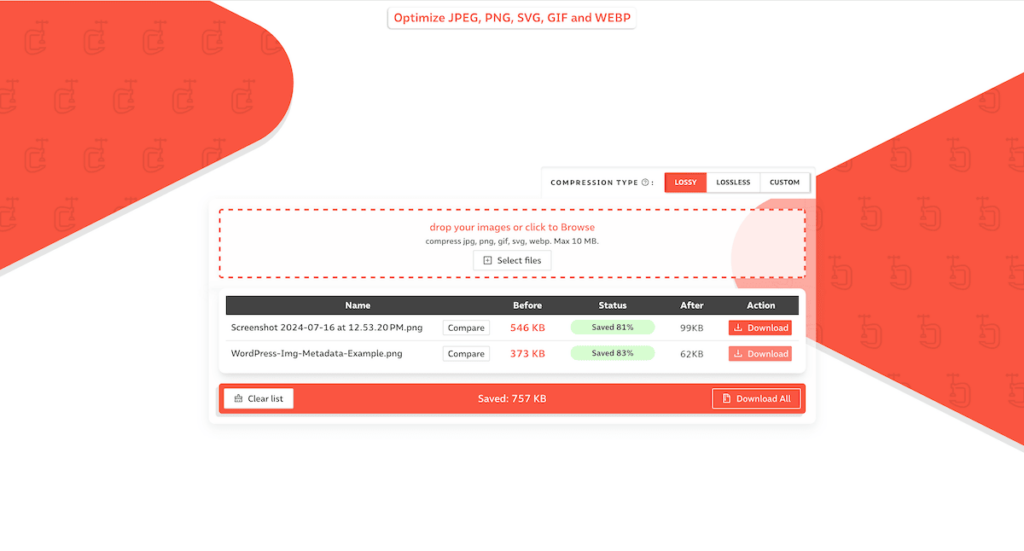
- Compress: Using a free image compressor like compressor.io can further reduce the file size of an image by up to 80% sometimes without making a noticeable impact on quality. Now would be a good time to rename your image for SEO purposes (more on that below.) If you follow nothing else in this guide, using these image compression tools are an extremely easy and straightforward way to reduce page load time.
Crop & Resize Images on Windows
- Open File Explorer and find the image you want to edit.
- Right-click on the image, hover over “Open with,” and select “Photos.”
- Click the “Edit & Create” button in the top-right corner.
- Select “Edit” from the dropdown menu.
- Click the “Crop & rotate” button.
- Adjust the cropping frame by clicking and dragging the corners or edges of the frame. Once satisfied, click the “Save a copy” button to save the cropped image.
- Open the cropped image in Paint (right-click the image, hover over “Open with,” and select “Paint”).
- Click the “Resize” button in the Home tab.
- Ensure the “Maintain aspect ratio” checkbox is checked.
- In the “Horizontal” box, enter “1200” (the vertical dimension will adjust automatically). Click “OK” to resize the image.
- Click “File” in the top menu bar and select “Save as.” Choose the desired location and format, and click “Save.”
Crop & Resize Images on Mac
- Locate your image in Finder
- Open the image in Preview (double click on the image)
- Press and drag your selection
- Hover on Tools in the top menu bar, select Crop
- Hover on Tools again, select Resize Image
- In the width box, put 1200px & confirm
- Save the image by hovering on File in the top menu bar and selecting save (or press ⌘ S)
Image Metadata: The Catalogue Card for Your Photos
Before we delve into Image Metadata, let’s back up and ask the question: “What is Metadata?”
Metadata defined for the laymen
To define it simply: Metadata is data about data. It’s information that categorizes and summarizes what something is.
To use an analogy: In the 80’s you needed to find a book (website) at the library (web). You would use the library catalogue (Google, Bing, Yahoo, etc.) to search for the book either by it’s name or author. When you found the right card (search result), it would tell you the call number or location. You would then go through the shelves or ask a librarian for help (click) and eventually find and check out your book (website).
In our case, we use metadata describing your website to help the robots that search engines use to rank search results better understand who your organization is, what you do, when you’re open, how to contact you, etc. and ultimately rank as high as possible.
What do I need to know about image metadata?
Image metadata is important not only because it helps these robots understand images they can’t actually see (yet) and determine if they’re relevant or not, but also ensures your website remains accessible for those with sight disabilities or a painfully slow internet connection by providing descriptions of what they’re viewing.
Image metadata can feel complex to understand considering all the various elements that go into it, and even harder to know what to prioritize. But luckily, the elements that have the greatest visibility impact are also some of the simplest to incorporate. Here are the three most important elements concerning image metadata:
- Alt Text: Alt text, short for Alternative Text, is the most important part of image metadata. This is really just a brief description of what the image is. It’s used for people who rely on screen readers, when the image fails to load to give context (common for those with slow internet connections), and for showing search engines that this image is relevant in relation to your organization.
- File Name: An images name before uploading it plays a huge factor in helping search engines better understand the image content and increase it’s visibility. This is a great place to tie your images with your company and it’s specific services or people. Instead of “mark.jpg”, something like “Mark-Scott-Sales-Manager-Generica-Inc.jpg” helps search engines recognize that Mark Scott is the Sales Manager at Generica Inc, this is his picture, and that this image is relevant to the blurb describing him below it.
- Title: The title tag is used as a tooltip description, providing supplemental information when the user hovers over an image. However, the this only applies to users on desktop. This is a good place to add keywords if warranted.
Let’s get to work: An actionable Image Optimization checklist
Now that we’ve explained the abstract concepts behind Image Optimization and it’s two major components: Image Compression and Image Metadata, let’s go through a step by step process on how to actually incorporate these pieces efficiently:
- Gather your images into a folder called something like [subject]-originals
- Decide where you’re uploading these images and crop each one as needed
- Resize the width of each image to 1200px
- Reformat each image. Are they photographs? Go with .JPG. Are they graphics or use transparent backgrounds? .PNG is the way to go
- Create a folder called [subject]-optimized and upload your edited images to compressor.io
- Download each image, saving it into the [subject]-optimized folder and rename each image to relate to your organization and the relevent service or person
- If you want a break, now’s a good time
- Login to your WordPress website, and navigate to the Media tab in the admin panel
- Upload your optimized images
- Return to the media library, click on the first image thumbnail in the upper left. This will open the image metadata panel. In the alt field, write a brief description of the image in question either manually or use AI to assist you. If you have a premium ChatGPT plan, use our A11y SEO Image Wizard.
- Fill out the alt text (and optionally the title) for the remaining images. Congratulations! You’ve now optimized the images on your website. Your images can be now be added to the posts or pages of your choosing.
If you followed this checklist, you can rest easy that the most important standards concerning image optimization are being met. Your web page will now appear more attractive to search engines, as well as improve the page load times and accessibility for your visitors.
Leave a Reply