Category: Tools

  • Windows PowerToys Is the Productivity Upgrade Windows Should Have Shipped With

    Windows PowerToys Is the Productivity Upgrade Windows Should Have Shipped With

    If you use Windows every day, you’ve probably felt it: the OS is powerful, but a handful of small things slow you down more than they should.

    That’s where Microsoft PowerToys comes in.

    PowerToys is a free, Microsoft-supported utility suite that adds practical, no-nonsense features to Windows. These aren’t gimmicks—they’re tools that shave seconds and friction off everyday tasks. Over time, that adds up.

    If you work in design, development, strategy, or any role that lives inside a computer all day, PowerToys is absolutely worth installing.


    What Is Windows PowerToys?

    PowerToys is an open-source collection of utilities built by Microsoft and the Windows community. Think of it as “advanced user features” that never quite made it into the core OS.

    The project has roots going back to Windows 95, when Microsoft first released a set of free utilities for power users who wanted to push the boundaries of what the operating system could do. After a long hiatus through Vista, Windows 7, and Windows 8, PowerToys returned in 2019 as an open-source project—and it’s been actively developed ever since.

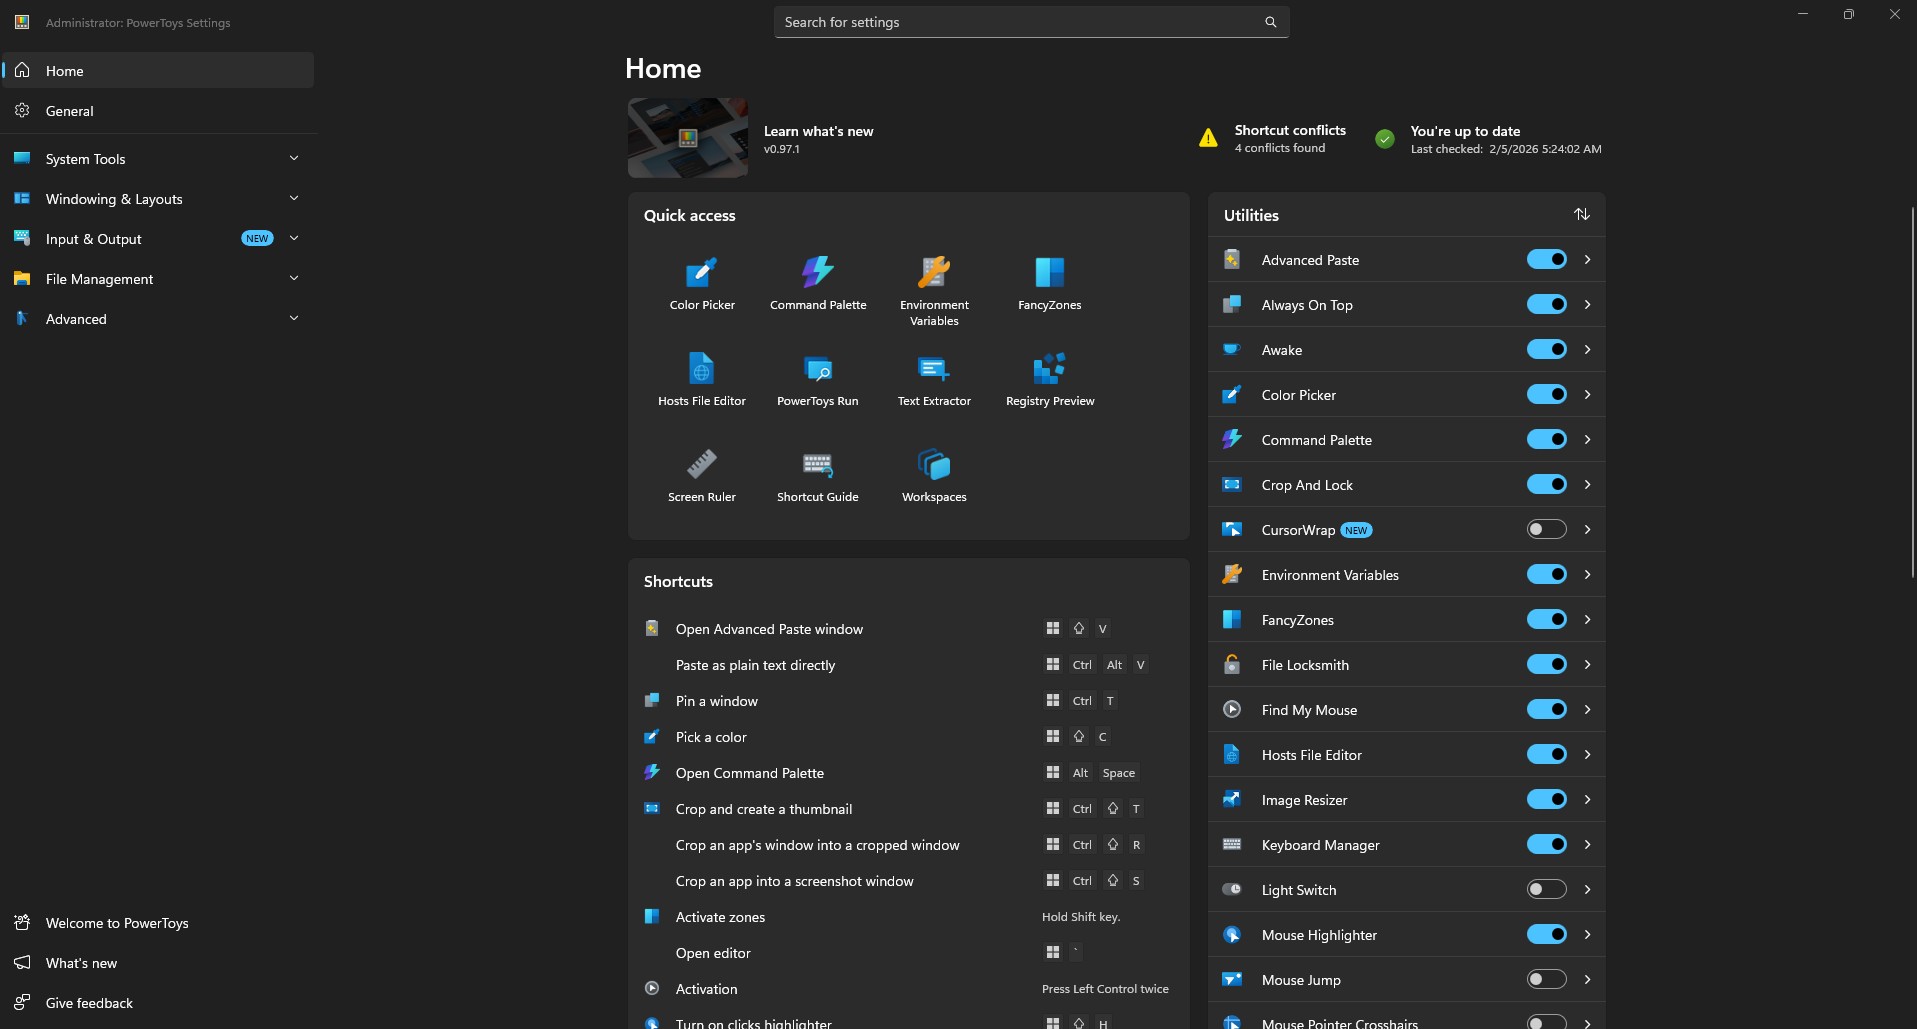
    As of early 2025, the suite includes over 25 utilities. It runs quietly in the background and integrates directly into Windows Explorer, keyboard shortcuts, and window management.

    Once installed, it feels less like an app and more like Windows finally grew up.


    How to Install PowerToys

    Installation is straightforward. You have three options:

    1. Microsoft Store – Search for “PowerToys” and click Install
    2. GitHub – Download the latest release from the PowerToys repository
    3. Windows Package Manager – Run winget install --id Microsoft.PowerToys from the command line

    Once installed, most features are enabled by default. You can toggle individual tools on or off from the PowerToys dashboard.


    The PowerToys Tools I Use the Most

    PowerToys includes a lot of utilities. These are the ones that consistently earn their keep.

    Image Resizer

    Image Resizer lets you right-click any image and resize it instantly. No Photoshop. No export dialogs. No guesswork.

    You can create presets for common use cases: web images, presentations, print, social media, native camera resolutions. Once configured, resizing becomes a one-second operation.

    For designers and content creators, this alone justifies installing PowerToys.

    FancyZones

    FancyZones is a window manager that lets you define custom window layouts and snap apps exactly where you want them.

    As WindowsForum notes, FancyZones “solves a perennial frustration: snapping and positioning windows precisely and efficiently.” Its flexibility outpaces native Windows Snap Assist, with support for custom templates, multiple workspaces, and hotkeys.

    This is especially useful if you use ultrawide or large monitors, juggle design tools with browsers and docs, or hate constantly resizing windows. Press Win + Shift + ` to open the Zone Editor, then drag windows into your defined zones while holding Shift.

    PowerRename

    PowerRename brings advanced batch renaming directly into File Explorer. Right-click selected files, choose “Rename with PowerRename,” and you can replace text across dozens of files, add prefixes or suffixes, use regular expressions, and preview changes before committing.

    If you deal with photos, assets, exports, or client files, this is a lifesaver. The utility is based on Chris Davis’s SmartRename, and it’s been refined over years of community contributions.

    Peek

    Peek lets you preview files with a single shortcut: Ctrl + Space.

    Images, PDFs, text files, and more open instantly in a lightweight preview window. No app switching. No clutter.

    As PCWorld observes, it functions like macOS Quick Look—something Windows users have wanted for years.

    Keyboard Manager

    Keyboard Manager allows you to remap keys and shortcuts globally.

    This is perfect if you switch between operating systems, have a broken or inconvenient key, or want custom shortcuts for repetitive actions. Changes remain active as long as PowerToys runs in the background.


    Tools You Might Have Overlooked

    Beyond the essentials, PowerToys includes several utilities that don’t get as much attention but are genuinely useful.

    Color Picker

    Color Picker is a system-wide eyedropper tool activated with Win + Shift + C. Click anywhere on screen to grab the exact color value in HEX, RGB, HSL, CMYK, or other formats. The color is copied to your clipboard automatically.

    As PCTips notes, this is essential for anyone working with graphics, web design, or content creation. The utility also maintains a history of previously picked colors.

    Text Extractor

    Text Extractor uses OCR (optical character recognition) to copy text from anywhere on your screen. Press Win + Shift + T, select an area, and the text is extracted—whether from an image, video, screenshot, or locked PDF.

    This is one of those tools you don’t think you need until you do.

    File Locksmith

    Ever tried to delete or move a file and received the dreaded “file is in use” error?

    File Locksmith shows you exactly which process is locking the file. Right-click any file in Explorer, select “What’s using this file?” and you’ll see a list of processes. You can then close those processes directly from the utility.

    As How-To Geek explains, this eliminates the frustrating guesswork of figuring out why you can’t modify a file.

    Advanced Paste

    Advanced Paste (Win + Shift + V) goes beyond simple clipboard management. You can paste text as plain text, Markdown, or JSON. There’s also a clipboard history that shows everything you’ve copied.

    If you have an OpenAI API key, you can enable AI-powered paste transformations—summarizing text, translating between languages, or reformatting content on the fly. Imaginet provides examples of using AI paste to rewrite text in specific styles or generate code from descriptions.

    Always On Top

    Need a window to stay visible no matter what? Press Win + Ctrl + T to pin it on top of everything else. The window gets a blue border to indicate it’s pinned.

    Simple, but surprisingly useful for reference windows, timers, or video calls.

    PowerToys Awake

    Awake keeps your computer from sleeping during long tasks—downloads, installations, renders—without touching your power settings.

    You can set it to stay awake indefinitely or on a timer. A tray icon shows the current mode and time remaining.

    Find My Mouse

    Lost your cursor on a large display or multi-monitor setup? Double-tap Ctrl and a spotlight appears around your mouse position.

    TechRepublic calls this especially handy for presentations on large displays when you want to draw attention to a specific area.

    Mouse Without Borders

    This utility lets you control up to four computers with a single mouse and keyboard, share clipboards between machines, and transfer files up to 100MB.

    As Microsoft’s documentation explains, it’s essentially a software KVM switch. All machines need to be on the same network and running Windows. Setup requires generating a security key on one machine and entering it on the others.

    For anyone with multiple workstations or a laptop-desktop setup, this eliminates the need for extra hardware.

    PowerToys Run

    PowerToys Run (Alt + Space) is a quick launcher that searches and opens applications, files, and system tools instantly. It’s modular and supports community plugins for extended functionality.

    If you’ve used Spotlight on macOS, this will feel familiar. Many users find it more reliable than Windows Search for actually launching apps.

    Microsoft has announced that PowerToys Run is getting a major refresh in 2025, with a revamped UI and improved extensibility support. The new version is being called “Command Palette” and will serve as PowerToys Run’s successor.

    Workspaces

    Workspaces lets you launch multiple applications into preset window configurations with a single click.

    Set up your development environment—VS Code on the left, browser on the right, terminal at the bottom—and save it as a workspace. Next time, launch everything in position with one shortcut.

    Screen Ruler

    Activated with Win + Shift + M, Screen Ruler lets you measure pixels on screen using edge detection. Useful for designers checking spacing and alignment without opening a separate tool.

    Shortcut Guide

    Press Win + Shift + / (or hold the Windows key) to see a visual overlay of available keyboard shortcuts for the current desktop state.

    Helpful for discovering shortcuts you didn’t know existed.

    File Explorer Add-ons

    These add-ons extend File Explorer’s Preview Pane to support additional file types: SVG images, Markdown documents, source code with syntax highlighting, PDFs, and more.

    Hosts File Editor

    A simple interface for editing your Windows hosts file—useful for local development, blocking sites, or DNS testing—without manually navigating to system folders.

    Quick Accent

    Quick Accent provides an alternative way to type accented characters when your keyboard doesn’t support them. Hold a key and a popup shows available accented variations.


    Why PowerToys Fits How I Work

    Good tools don’t shout. They reduce friction.

    PowerToys does exactly that. It respects your time, stays out of your way, and improves workflows instead of reinventing them. It’s modular—you enable only what you need—and it’s built by developers who actually use their computers to get work done.

    That aligns with how I think about the tools I recommend to clients: sustainable, practical, and focused on making real tasks easier.


    Should You Install It?

    Yes.

    PowerToys is free, lightweight, actively maintained, and easy to uninstall if you change your mind. Most people who install it never go back.

    You can download it from the Microsoft Store or the GitHub releases page.


    Final Thought

    Windows is already powerful. PowerToys makes it intentional.

    If you care about efficiency, clarity, and tools that quietly make you better at your work, PowerToys belongs on your machine.


    Sources referenced in this article:

  • How I’m Using AI to Build Better Systems for Business and Life

    How I’m Using AI to Build Better Systems for Business and Life

    How I Use AI in My Business

    How I Use AI in My Personal Life

    Personalizing Your AI Experience

    Final Thoughts: AI is a Tool, Systems are the Secret

    👉 Contact Me Here

  • WordPress SEO for the Busy Entrepreneur: Image Optimization

    Are you trying to DIY your online presence but are struggling to understand all the search engine optimization (SEO) terms? Are you worried about causing more damage or harm than good, or overwhelmed with deciphering what practices are essential and what could be saved for a rainy day?

    Hello and welcome to the first chapter of our WordPress SEO for the Busy Entrepreneur series where we help our clients, fellow entrepreneurs, and aspiring digital marketers better understand the foundational practices of SEO for their website’s organization.

    We know the stress of trying to run a business on top of marketing it. That’s why people come to us and we have a business! (Talk about the circle of life!) But we also have many wonderful clients who aren’t at that stage of their entrepreneurial journey, who need a professional website with reliable hosting and can’t afford a marketing agency quite yet. Yet, many have a drive that knows no bounds and are more than willing to put in the work updating their website with edits and blog posts. They just don’t have the time to learn what’s important, what’s less so, what resources to trust and learn from.

    It’s become clear to us that there needs to be a resource for entrepreneurs who are willing to put in the work, but can’t afford a single moment more. For those who need the pieces broken down and targeted specifically for their WordPress site. For those who aren’t technically savvy and have no desire to be, they just want things to work and for customers to go 📈. If any of these sounds like you, you’re in the right place.

    Today, we’ll be talking about Image Optimization, why it’s important and how it plays into your institutions marketing success, and ranking each piece by what’s most important as well as the process we recommend you take for the most efficient use of your time.

    What is Image Optimization?

    Image optimization is the process of converting high quality photographs, artwork, and graphics from their original state into copies that are optimized for websites and social media platforms. This process involves two main procedures:

    1. Cropping, resizing, and saving images into a compressed format while sacrificing minimal quality
    2. Correctly categorizing and describing the images you’re using through image metadata

    Just like you wouldn’t want to wear a t-shirt that’s 5 sizes too big and claims to be “wrinkle-free” when it’s clearly not, you wouldn’t want an image on your website that takes 2 minutes to load and ends up not being what the user was looking for. The process of image optimization is like tailoring that oversized t-shirt to fit just right.

    Image Compression: Tailor Your Images to the Digital World

    Image Compression is ultimately about carefully cropping, resizing, and compressing the image file so it loads quickly and looks great on screens – without sacrificing the quality or intent of the original image.

    Image Compression can be broken down into 4 steps:

    1. Crop: Crop the image so that the main focus is centered, if needed. Consider the platform(s) you’re uploading to and whether they use a square, rectangular, or circular aspect ratio. This not only reduces the file size, but also improves it’s impact.
    2. Resize: Digital cameras today are capable of taking superb quality photographs in 4K resolution. But images on web pages or social media platforms are rarely displayed at this resolution, since most images are not displayed full screen and the majority of internet users are using devices lacking 4K output. When in doubt, a 1200px width is more than enough for the vast majority of images used on a web page.
    3. Reformat: There are plenty of image formats out there nowadays. Each come with their own benefits and drawbacks, but to keep it simple: Use .jpg for images that have a background, and .png for images that have a transparent or no background. The default quality option should be sufficient.
    4. Compress: Using a free image compressor like compressor.io can further reduce the file size of an image by up to 80% sometimes without making a noticeable impact on quality. Now would be a good time to rename your image for SEO purposes (more on that below.) If you follow nothing else in this guide, using these image compression tools are an extremely easy and straightforward way to reduce page load time.
    Screenshot of compressor.io reducing the file size of an image

    Crop & Resize Images on Windows

    1. Open File Explorer and find the image you want to edit.
    2. Right-click on the image, hover over “Open with,” and select “Photos.”
    3. Click the “Edit & Create” button in the top-right corner.
    4. Select “Edit” from the dropdown menu.
    5. Click the “Crop & rotate” button.
    6. Adjust the cropping frame by clicking and dragging the corners or edges of the frame. Once satisfied, click the “Save a copy” button to save the cropped image.
    7. Open the cropped image in Paint (right-click the image, hover over “Open with,” and select “Paint”).
    8. Click the “Resize” button in the Home tab.
    9. Ensure the “Maintain aspect ratio” checkbox is checked.
    10. In the “Horizontal” box, enter “1200” (the vertical dimension will adjust automatically). Click “OK” to resize the image.
    11. Click “File” in the top menu bar and select “Save as.” Choose the desired location and format, and click “Save.”

    Crop & Resize Images on Mac

    1. Locate your image in Finder
    2. Open the image in Preview (double click on the image)
    3. Press and drag your selection
    4. Hover on Tools in the top menu bar, select Crop
    5. Hover on Tools again, select Resize Image
    6. In the width box, put 1200px & confirm
    7. Save the image by hovering on File in the top menu bar and selecting save (or press S)

    Image Metadata: The Catalogue Card for Your Photos

    Before we delve into Image Metadata, let’s back up and ask the question: “What is Metadata?”

    Metadata defined for the laymen

    To define it simply: Metadata is data about data. It’s information that categorizes and summarizes what something is.

    To use an analogy: In the 80’s you needed to find a book (website) at the library (web). You would use the library catalogue (Google, Bing, Yahoo, etc.) to search for the book either by it’s name or author. When you found the right card (search result), it would tell you the call number or location. You would then go through the shelves or ask a librarian for help (click) and eventually find and check out your book (website).

    In our case, we use metadata describing your website to help the robots that search engines use to rank search results better understand who your organization is, what you do, when you’re open, how to contact you, etc. and ultimately rank as high as possible.

    What do I need to know about image metadata?

    Image metadata is important not only because it helps these robots understand images they can’t actually see (yet) and determine if they’re relevant or not, but also ensures your website remains accessible for those with sight disabilities or a painfully slow internet connection by providing descriptions of what they’re viewing.

    Image metadata can feel complex to understand considering all the various elements that go into it, and even harder to know what to prioritize. But luckily, the elements that have the greatest visibility impact are also some of the simplest to incorporate. Here are the three most important elements concerning image metadata:

    1. Alt Text: Alt text, short for Alternative Text, is the most important part of image metadata. This is really just a brief description of what the image is. It’s used for people who rely on screen readers, when the image fails to load to give context (common for those with slow internet connections), and for showing search engines that this image is relevant in relation to your organization.
    2. File Name: An images name before uploading it plays a huge factor in helping search engines better understand the image content and increase it’s visibility. This is a great place to tie your images with your company and it’s specific services or people. Instead of “mark.jpg”, something like “Mark-Scott-Sales-Manager-Generica-Inc.jpg” helps search engines recognize that Mark Scott is the Sales Manager at Generica Inc, this is his picture, and that this image is relevant to the blurb describing him below it.
    3. Title: The title tag is used as a tooltip description, providing supplemental information when the user hovers over an image. However, the this only applies to users on desktop. This is a good place to add keywords if warranted.

    Let’s get to work: An actionable Image Optimization checklist

    Now that we’ve explained the abstract concepts behind Image Optimization and it’s two major components: Image Compression and Image Metadata, let’s go through a step by step process on how to actually incorporate these pieces efficiently:

    1. Gather your images into a folder called something like [subject]-originals
    2. Decide where you’re uploading these images and crop each one as needed
    3. Resize the width of each image to 1200px
    4. Reformat each image. Are they photographs? Go with .JPG. Are they graphics or use transparent backgrounds? .PNG is the way to go
    5. Create a folder called [subject]-optimized and upload your edited images to compressor.io
    6. Download each image, saving it into the [subject]-optimized folder and rename each image to relate to your organization and the relevent service or person
    7. If you want a break, now’s a good time
    8. Login to your WordPress website, and navigate to the Media tab in the admin panel
    9. Upload your optimized images
    10. Return to the media library, click on the first image thumbnail in the upper left. This will open the image metadata panel. In the alt field, write a brief description of the image in question either manually or use AI to assist you. If you have a premium ChatGPT plan, use our A11y SEO Image Wizard.
    11. Fill out the alt text (and optionally the title) for the remaining images. Congratulations! You’ve now optimized the images on your website. Your images can be now be added to the posts or pages of your choosing.

    If you followed this checklist, you can rest easy that the most important standards concerning image optimization are being met. Your web page will now appear more attractive to search engines, as well as improve the page load times and accessibility for your visitors.

  • 5 Figma Tools to Improve Your Web & Digital Marketing Strategy

    In today’s ever-evolving digital marketing and web design scene, streamlining your workflow is more valuable than ever. Amid a plethora of tools, identifying those that can truly streamline your strategy instead of distract can be a formidable task. Figma’s community shares files and plugins that are helpful for crafting professional web and marketing content. In this article, we focus on five practical user-made Figma tools that can refine your creative process and make your web and marketing strategy faster and more professional.

    1. Complete Favicon Generator by Ernest Ojeh

    Today, responsive website design isn’t a nice to have – it’s a requirement, and favicons are no exception. This handy design file by Ernest Ojeh takes your finalized favicon image and lets you see what it looks like across different browsers and devices. This is perfect for ensuring the chosen brand icon can be easily recognizable across devices and to show clients what it’s going to look like in various browser tabs and search engines. Additionally, each version that’s generated is contained in a frame with a matching name so using the included embed code is a simple copy paste procedure.

    2. Social Media Images Size by Andreslav Kozlov

    Remembering all the different ideal image sizes across all the different platforms can become quite a headache. Failure to do so often results in subpar, low quality, and pixelated posts that look unprofessional and uninspiring to viewers. This plugin by Andreslav Kozlov allows you to import perfectly sized Figma frames tailored for a wide array of social media platforms at the click of a button. Whether it’s the square layout for Instagram, the wide banner for Twitter, or the unique dimensions for LinkedIn, this plugin has all the popular platforms. This useful plugin saves time and elevates the quality of social media posts, ensuring they look crisp and engaging on any platform.

    3. Social Media Templates by Ravn

    Having your social media images in the proper size and body content ready is great for clients, but this Figma file lets you take that to the next level. With Social Media Templates by Ravn, now you can show exactly what a client’s content will look like across Facebook, Instagram, LinkedIn, and X/Twitter. It even includes a prototype section with interactive carousel mockups for posts with multiple images!

    4. Realtime Colors by Juxtopposed

    This isn’t your average color palette generator. realtimecolors.com is a color and font visualizer platform specifically for web designers. Using a website structure template, now you can generate and see colors and fonts provided via Google Fonts in real time. Another notable feature is it’s expansive export options – you can save and send these examples simply by sending a link to clients, providing an easily accessible starting point when making design decisions. You can also export by download, QR code, CSS code, the Figma plugin, and more, making documenting and implementing these colors and fonts on your website and marketing materials a breeze.

    5. ColorLabels by Naren Abbaraju

    If using the Realtime Colors plugin isn’t easy enough, here’s another to make things even easier. ColorLabels by Naren Abbaraju quickly lets you label color swatches on Fimga in a variety of formats, including RBG, HEX, HSL, and HSB. The best part? Color Labels can also automatically detect and apply Coolors.co‘s custom color labels. Calling a color swatch Aquamarine instead of #67EFE1 or “the light greenish one” is much easier for you and your clients to say, understand, and remember. It’s one of those simple changes that make the process a little more approachable.

    Example of the ColorLabels plugin created by Naren Abbaraju

    Closing Thoughts

    Navigating the world of Figma tools designed to enhance your web and digital marketing strategies can feel like entering a gold mine. With the right tools, you can supercharge your creative process, increase your efficiency, and present a polished, consistent brand image that resonates with your audience.

    Every new tool feels like a game-changer. But remember, this is just the tip of the iceberg. The vibrant community of Figma is loaded with new plugins, files, and ideas that are just waiting to be discovered, used, and shared.

    So, what’s the next step? Start including one or more of these tools in your strategy today. Share your triumphs and trials with them. Trade ideas with the community, learn from each other, and keep your toolbox ever-evolving. Most importantly, remember that in the ever-changing world of web and digital marketing, your greatest tool is your adaptability.

    Let’s embrace Figma to not just reach, but to exceed our creative and strategic goals, and propel our narratives into the stratosphere.

  • 5 Informative (And Free!) Web Design Tools That Can Teach You More About Your Site

    Above all, websites are vehicles designed to help you achieve larger goals. For example, a restaurant’s site might be created to increase awareness and encourage patrons to visit (or order takeout). An entrepreneur might rely on a website to inform potential clients about his or her services. 

    While a website is an ideal tool for online marketing in the 21st century, there’s no guarantee it’ll work the way you intended. Website design requires constant monitoring, updating, and adjusting in order to ensure a site is optimized for performance.  

    In order to be able to make the right adjustments, you have to first gather accurate information about your site’s functionality. Fortunately, there are a plethora of online web design tools that provide insightful and in-depth data about a site’s performance. Let’s take a look at a few you should know about.

    1. SEMRush 

    Touted by many online marketers as the premier and most comprehensive online marketing tools, SEMRush offers users an in-depth analysis of their site’s advertising information. 

    It offers data regarding paid and organic search traffic, domain referrals, backlinks, and more. This is all available in SEMRush’s free report, although you can unlock an even more extensive review for the paid version. 

    Despite being advertised as an all-in-one platform, SEMRush probably won’t eliminate the need to use other online web tools. Still, it’s a great place to start your advertising research. 

    1. ScanWP

    If you know a site is running WordPress but aren’t sure which theme, that’s where ScanWP comes in handy. Simply plug in the URL of the site, hit “search”, and you’ll be provided with a host of helpful information such as the theme version, price, associated tags, and where the theme can be purchased. 

    ScanWP even comes with Plugin detection so you can get a better idea of what’s been added to the site. Compared to other online web design tools, ScanWP is rather minimal but that’s one of its advantages too! It’s a great option for WordPress fans and can even be downloaded as an extension for Chrome browser for integrated use. 

    1. Nibbler

    Nibbler isn’t as well known as some other online web design tools, but it still earns a spot on the list. With the free version, you can put five different pages through the Nibbler tests which analyzes your site based on more than a dozen factors and offers an overall score.

    The total score (out of 100%) is an aggregate rating of your site’s accessibility, experience, technology, marketing, and more. In addition to this composite score, you’ll get a deeper breakdown of each factor, giving you a better look at your site’s strengths and weaknesses.  

    Nibbler even offers a handy list of top priorities for improving your site. 

    1. GTmetrix 

    GTmetrix is an informative online web design tool that analyzes a site’s page performance. Whether you’re trying to improve search engine optimization (SEO) or implementing a new theme, it’s always important to know how site changes are impacting overall functionality. 

    In its “speed visualization” section – pictured above – GTmetrix provides an insightful breakdown of how quickly (or slowly) your site loads by second. This gives you a better idea of how users interact with your site. 

    This online web design tool’s report page acts as an analytics dashboard where key indicators of site load speed are neatly organized and summarized. Similar to Nibbler, you’ll also get actionable tips for improving your site page speed. 

    1. Pagelocity 

    Customer experience is an integral component of website design. If you’re looking for a web design tool that’s geared towards analyzing your site’s optimization in this area, Pagelocity is an excellent choice. Its analysis focuses on three different categories: on-page SEO, performance, and code insights. 

    On-page SEO offers insights into various factors on your site that are critical to SEO such as headings, keywords, and links (both internal and external). Performance analyzes your site’s composition including scripts, style files, and images to determine its overall functionality. Lastly, Code Insights goes a little more in-depth to look at a site’s markup which refers to tags, classes, and page speed. 

    Your Local Web Design Expert 

    If you’re not sure how your website is performing, David Martin Design can help. With decades of experiencing building, designing, and optimizing sites, David knows what it takes to keep websites up and running efficiently to meet your goals. Feel free to contact David to learn more. 

  • Instant SEO Boost: How Compressor.io Can Drastically Improve Your Site’s Exposure

    This search engine optimization tip goes way back to the early 90s –  back when I first started building websites. In the 90s, it was essential to build websites that were quick and optimized because people still had dial-up  internet connections. In order to build a fast loading website, you had to be very careful not to use too many large images. If you did include bigger image files, then it would take forever for the website to load, and we all know that we only have a fleeting amount of time to capture somebody’s attention.

    What does Compressor.io do?

    With Compressor.io, you can easily upload your images in a variety of formats – including PNG, GIF, & JPEG – and this program will try to condense them without losing too much quality. As you can see from the featured image of this post, I was able to capture an image of myself taking a picture in my car’s rearview mirror that was over 8 megabytes and compress it down to a much smaller size. The image has maintained it’s quality without causing my site’s load speed to slow down every time a visitor clicks on this page. 

     Whenever you upload your images to Facebook, Instagram, and other sites, they automatically apply compression to your images to make them load faster for  a better user experience. When you run your own website though, WordPress doesn’t automatically include compression functionality out of the box. There are different plugins that you can use to help compress your images when you upload them to the media library, however, I like to compress the images before I upload them by using Compressor.io.

    How do you use Compressor.io to condense images?

    It starts out with you getting your original image from your camera. Then, once you have it downloaded on your device, you can upload it to your website. Then, after Compressor.io compresses your image, you can download it onto your local machine again. Once it is on your local machine, then you go into your WordPress media library and upload it. It’s as simple as that!

    How does this application impact my website’s SEO?

    Compressor.io works to condense your website images to help them  load faster. In turn, this ends up increasing the load speed of your entire website. With no bulky image files eating up bandwidth, your pages can refresh quickly for visitors, greatly increasing user experience. Perhaps most importantly, it will improve your website’s SEO. Because page speed is such an important factor for the algorithms that rank your web pages, your site will reach closer to the top search result when load time is optimized Using Compressor.io is a simple change that can work wonders for your website’s performance. 

    Whether you’re looking for ways to improve your site’s exposure or you want to build a site from scratch, David Martin Design can help. I’ve spent decades building, editing, and optimizing websites, and I’d be more than happy to support you in your business ventures. Feel free to reach out to me to learn more about what I offer.

  • What’s Microsoft Clarity and How Can It Help Improve Your Website?

    Picture this: You build an amazing site for your business and set it live. A few weeks pass by, and you eagerly check to see how many people visited your site. Despite receiving some decent traffic, you want to take immediate steps to improve these numbers but…you have no idea how to do it. 

    Many site owners find themselves in the exact same position. Even with ample data about their site performance, they’re still not sure how to iron out the kinks to offer users a seamless experience. Microsft Clarity just might be the tool to help solve this problem. 

    Here, we’ll take a deep look into what Clarity offers and how your website can benefit from it. 

    What is Microsoft Clarity? 

    Microsoft Clarity is a specialized analytics tool designed to help site owners gain a better understanding of how visitors interact with their site. With informative features such as heatmaps and session replays, Clarity can offer a unique view of your site’s performance that other popular tools such as Google Analytics simply don’t offer. 

    By tracking user behavior on your site, Clarity collects basic information regarding engagement, interactions, and sessions. This data is conveniently summarized in the dashboard, giving you quick and up-to-date statistics about your site. Users are broken down into various categories such as country and device type for more detailed insights. 

    What does Microsoft Clarity offer? 

    It’s no secret that some site analytics tools can take some getting used to. Fortunately, the simple layout of Microsoft Clarity and its relatively straightforward function make for a more user-friendly experience. 

    To get a better idea of what this newer tool offers, let’s dissect Clarity’s primary features. 

    Dashboard and Insights 

    The Microsoft Clarity dashboard acts as a central hub where all of your site’s data is collected and organized. Here, you can find standard metrics that most analytics tools provide including total sessions, unique users, pages per session, and engagement. 

    A quick glance at the Clarity dashboard will reveal some intriguing markers that you might not be familiar with. Dead clicks, rage clicks, and excessive scrolling are special insights designed to help site owners pinpoint problem areas that might be preventing visitors from having an optimal user experience. 

    If you’ve ever had a webpage freeze or refuse to load quicker than dial-up, you understand why “rage clicks” and “excessive scrolls” are the perfect indicators of user frustration. Identifying and fixing these problem areas might just be the key to boosting your site’s engagement and conversions. 

    Session Recording 

    While distinctive features such as rage clicks do a great job of setting Microsoft Clarity apart from well-established competitors, we’ve just taken a peek into this tool’s diverse bag of tricks. One of the most attractive features of Clarity is its comprehensive session recording application which records user behavior for each and every session. Everything from clicks, scrolls, and mouse movements are recorded and stored.

    You can review these clips at any time to get a clear picture of your average user’s behavior. This data is available for each page. For an even deeper understanding, Clarity organizes these recordings by specific browsers to help determine browser-specific issues. With advanced AI, you can even tell whether a particular session is part of a larger pattern or an outlier. This is useful for ruling out anomalies and addressing routine problems. 

    Heatmaps 

    While more general analytics can offer a good idea of how users bounce between your site’s pages, Microsoft Clarity takes it a step further by allowing site owners to see how visitors behave on individual pages. With the heatmaps function, you have a clear and informative view of where users tend to click. 

    This information is further divided by devices such as mobile, tablet, and desktop so you can see how behavior varies between each category. You can use this thorough tool to see how your visitors move around your site, where they’re getting hung up, and what can be done to improve their sessions. 

    How much does Microsoft Clarity cost? 

    You’ll be pleased to know that Microsoft Clarity is currently offered as a free service. There’s also no cap on traffic. This means that whether you need to track a newly built site or you want to switch analytics tools on a site that’s already successful, you’ll be paying the exact same amount…nothing! 

    Is it a replacement for Google Analytics? 

    While Microsoft Clarity is advertised as an analytics tool, it serves a very specific function. It can give you some insight that Google Analytics can’t, but that doesn’t mean you should say goodbye to your current applications. It works better as an excellent supplement to more comprehensive tools than it does as your primary resource. 

    Interested in making a site for your next project? Reach out to David Martin Design to learn more about the process. David has decades of experience building sites for business owners and can make a site based on your unique needs.

  • Grammarly Is Like Orthodontics For Your Writing

    Slowly, I believe that Grammarly is changing my writing behavior and improving my writing style. It provides great statistics and gives you information on what are the most often mistakes that you make. As I find myself writing more emails, web content, and social media posts, it’s important to me to make them grammatically correct.

    I wrote that entire first paragraph without any sort of green or red lines underlining my work! That’s an accomplishment in my book.

    I believe that Grammarly is a fantastic data tool that analyzes your writing and makes helpful AI-driven suggestions to help you make better writing choices. Over time it will help me align my writing more with what I am thinking and help me convey messages in a much clearer language for readers.

    Try out the Grammarly apps on your operating system of choice
    (MacOS, iPad, Chrome, Your Phone, or Microsoft Word).

    Grammarly is an American-based technology company that offers a digital writing assistance tool based on artificial intelligence and natural language processing. The software was first released in July 2009 in Kyiv, Ukraine.

    Let me know what you think of Grammarly and please share some of your writing.